Saturday, August 27, 2011

Watermelon and Goats Feta Salad

This recipe is a fantastic find from one of the blogs that inspired me to start blogging my own recipes. Luxirare is definately a woman with too much time on her hands (or maybe I am just bitter), creating really great food in unique ways, from cocktail jelly shots (and not the kind you would find at a student party) to bento boxes with a twist (B.L.T sushi anyone?). So this recipe is really simple, and its one of those that lets the flavours speak for themselves. I ended up cutting my watermelon slabs a little too thick but it really doesn't matter, you can do no wrong with this salad.


Ingredients:
  • seedless watermelon (cut into 1 inch thick slabs - mine were "round" but squares and rectangles will work great too)
  • 1 small round of goats milk feta (or any other crumbly goats cheese)
  • cherry tomatoes, halved
  • half an onion finely sliced (red works best but white will do)
  • 1 ripe mango
  • handfuls of rocket
  • 4 tbsp balsamic syrup (or simmer balsamic vinegar until it is reduced to a third)
  • olive oil
  • rock salt
Method:

Take the slabs of watermelon and place in the freezer for 15-30 mins (depending on the size) until firm but not frozen. Take out of the freezer and sprinkle generously with salt, then lashings of balsamic syrup and finally a good drizzle of olive oil.

Next divide the rest of the ingredients into four and pile on top. I started with rocket, then onion, tomatoes, mango, cheese and finally a little more rocket and a little drizzle of balsamic to finish it off.

As simple as that! Serve it with some crusty bread to mop up the juice or just devour it as is. I did this as a starter, followed by thai mussels (coming next).


Tuesday, August 23, 2011

Chocolate, Almond and Cardamom Cake

So daddy Naylor has arrived for one week and after yesterdays failed attempt at cornbread, I figured it's time to try out something sweeter. This mix of chocolate, nuts and spice is perfect for a little slice of decadence and the last time I made this was for a birthday cake.
Before you start to question if the "Cardamom Council" is slipping me a little "sugar sugar" for advocating its use in everything, I am merely just a great fan of its flavour (and smell!). Anyway back to the cake itself, chosen for its minimal use of flour (perfect for substituting with rice flower for the coeliac) and its great taste, the recipe is taken from a dessert cookbook some friends purchased for me as a thankyou for staying with us, and I love how the book is split into seasons (ideal for the seasonal produce available in Spain). It is originally called "cooking desserts" (but I have the spanish translated version) and is well worth getting a copy if you have as sweet a tooth as I do!


Ingredients:
  • 250g dark chocolate (broken into pieces)
  • 250g butter (cut into pieces)
  • 1 tbsp vanilla  extract
  • 250ml hot water
  • 175g caster sugar
  • 3 eggs (room temperature, lightly beaten)
  • 165g self-raising flour (I used rice flour and added 1tsp baking powder + 1 tsp bicarbonate of soda)
  • 100g ground almonds
  • 3tsp ground cardomom
  • 30g icing sugar
Method:

Pre-heat the oven to 160ºC and grease or line a 24cm cake tin (I used a loaf tin after my springform went to heaven)

Put the chocolate, butter, vanilla extract and hot water in a heat proof bowl. Place over a pan of boiling water, making sure the bottom of the bowl does not touch the water. Keep over a low heat and stir until melted. Remove from the heat and add to the sugar and mix well. Allow to cool a little and add the eggs and mix well (you will feel the mixture thicken slightly as you add the eggs, but it is important to keep mixing otherwise the eggs will scramble)


Mix in the flour, almonds and 2tsp of the ground cardamom and keep mixing until well combined. Tip the mix into your prepared baking tin and bake in the oven for 40 mins (or until an inserted skewer comes out clean. Leave to cool in its tin for 10 mins, then remove from the tin and leave to fully cool.

Mix the remaining teaspoon of cardamom with the icing sugar and dust all over (use a sieve to duste then a spoon to sprinkle the remaining ground cardomom in the sieve). Serve with a nice dollop or fresh whipped cream and the best coffee you have!


Sunday, August 21, 2011

Spontaneous Crisp Lettuce


Charles Dudley Warner knew how to appreciate a good lettuce. He once commented: “Lettuce is like conversation; it must be fresh and crisp, so sparkling that you scarcely notice the bitter in it”

Perhaps the best way to lay your hands on a perfect lettuce head is to grow your own... and if that fails nab one from your brother’s vegetable patch (or if you’ve been a v. good girl he might just give you one to take home with you, covered in mud and a slug or two: earthy!)

So there I was last week with my vibrant fresh lettuce, which once gently washed and patted dry, required eating. So what to eat with, to make the most of my lettuce? Rooting around in my kitchen, I came up with this refreshing little quick and easy little salad recipe.

This will serve one for a light main course or two for a starter.

Ingredients

• A few handfuls of crisp lettuce
• 1 carrot (peeled)
• 1 apple (peeled)
• 1 handful of sultanas
• 1 handful of dried cranberries
• 1 handful of walnuts
• 2 Tbs of plain soya yogurt
• 1 garlic clove
• A few springs of fresh parsley
• ¼ tsp of Dijon mustard
• Freshly ground black pepper (to taste)


Five simple salad-making steps

1. Wash your lettuce, pat dry with kitchen roll, break into pieces and arrange on serving plate
2. Slice carrot, chop apple into chunks and combine in a mixing bowl with the sultanas, cranberries and walnuts
3. In a small bowl combine well the soya yogurt, chopped up garlic, parsley, mustard and pepper
4. Pour dressing over the carrot mix and toss well
5. Spoon the carrot mix over the lettuce and serve immediately


Saturday, August 20, 2011

Caramelised Banana Cake with a Lime Twist


When the fruit bowl begins to smell a little of very ripe bananas it’s time to seize the banana cake window. This is my favourite banana cake of all time, dark, satisfyingly moist and surprisingly wholesome. It’s based on a popular Guardian recipe, but I’ve taken the dairy out and, as the title implies, I’ve given it a fragrant lime twist.

To get started you’re going to need:

For the cake:

150g caster sugar
2 large very ripe bananas chopped in pieces
1 tbsp soya spread
2 tsp good quality vanilla extract
175ml sunflower oil
100g light brown sugar
2 large eggs
50ml plain soya yogurt
Zest and juice of 1 lime
150g plain flour
75g rye flour
2 level tsp mixed spice
2 level tsp baking powder
½ level tsp bicarbonate of soda

For the icing:

75g soya spread,
300g icing sugar
2T soya milk
Juice and zest of one lime

Now let’s bake!

• Pre-heat oven to 180°C
• Line a baking tray – I like making this cake in a 20cm square tin as the resulting consistency of the cake is simply perfect


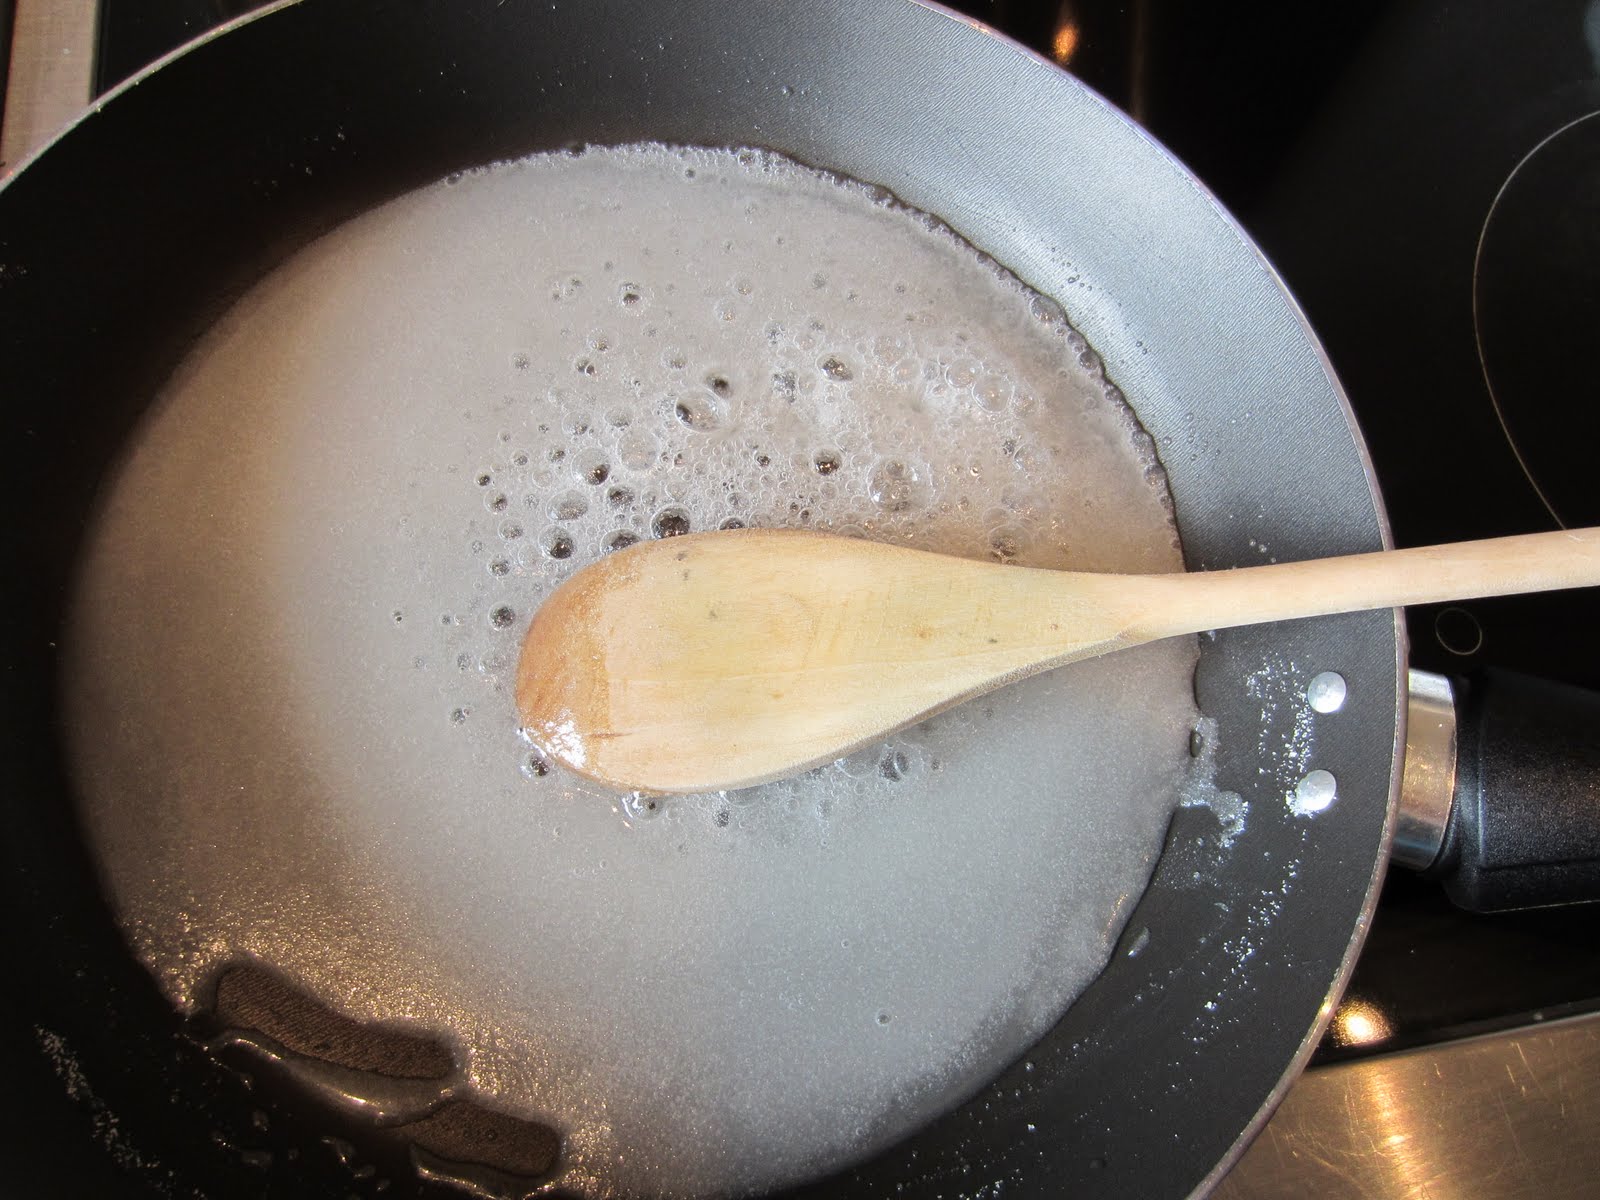
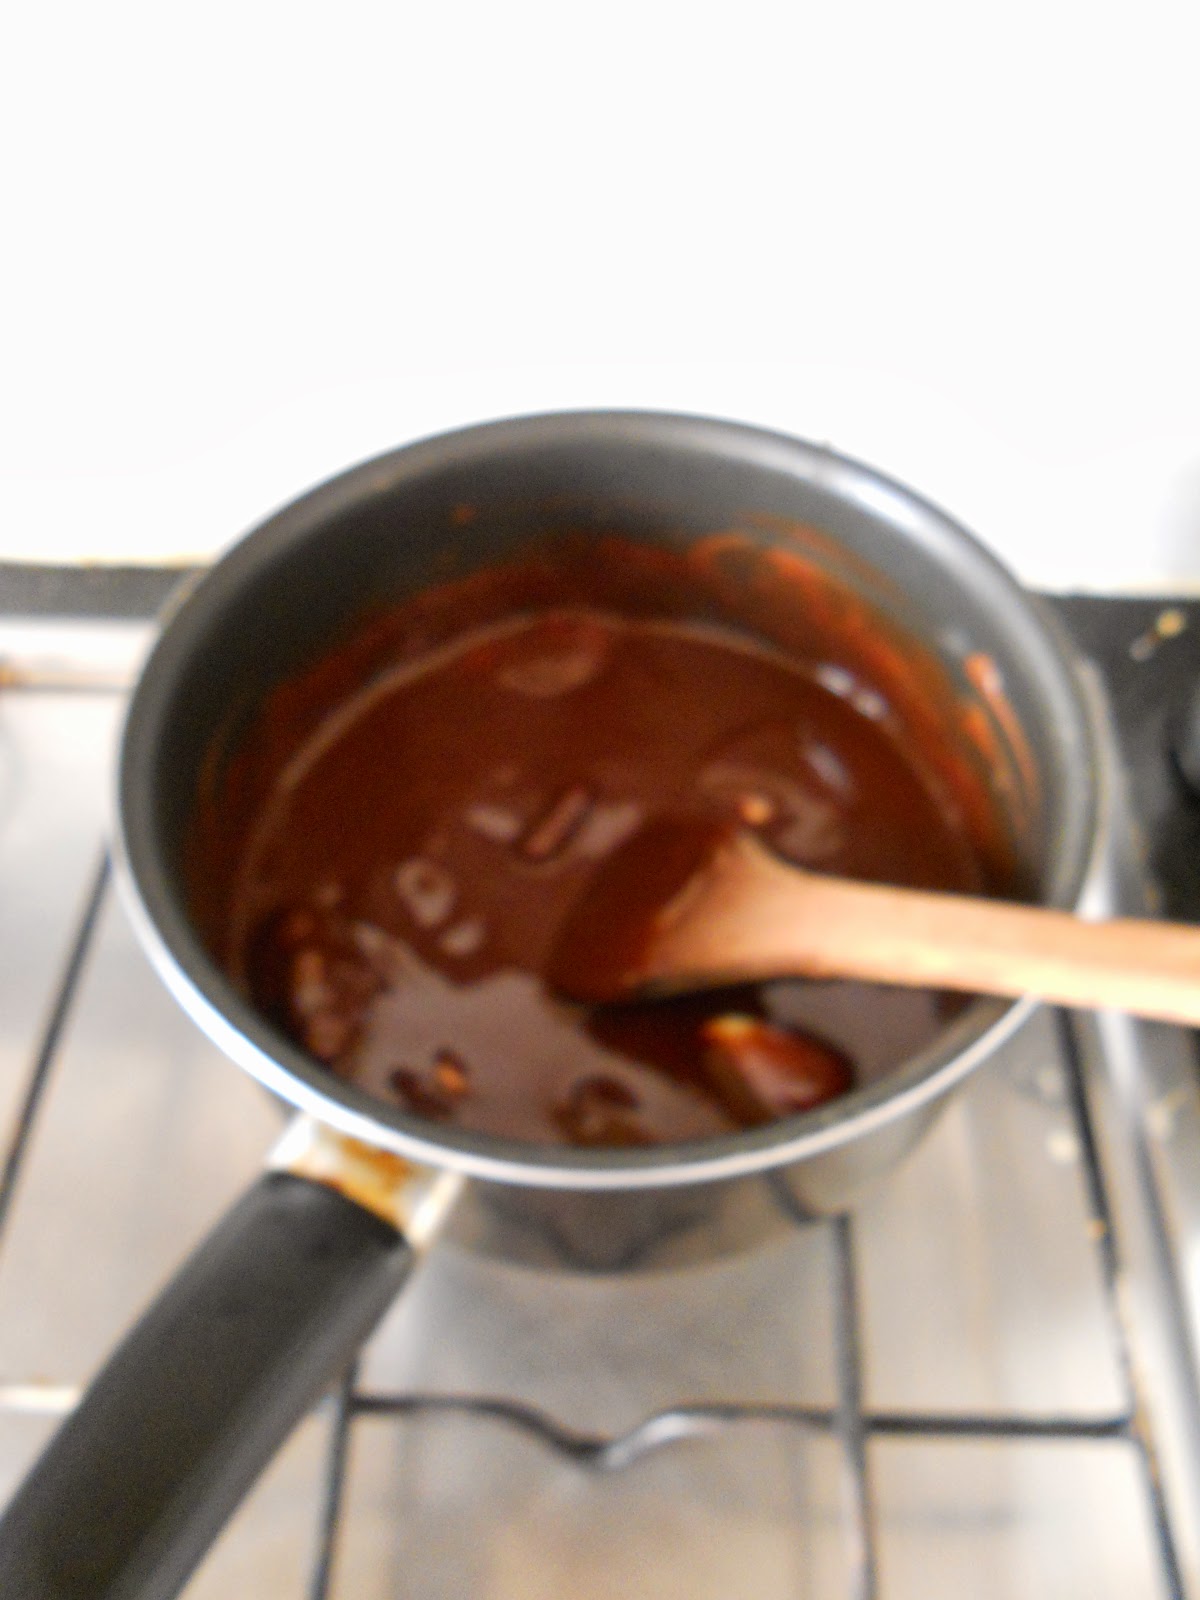
• Use a large frying pan to make the caramel sauce: mix the caster sugar with about 25ml of cold water. Stir together and bring to the boil, and, cooking over a high heat, continue stirring until the mixture begins to darken in colour


• Add the soya spread, and vanilla and banana. Continue cooking until the banana pieces have broken down and the mixture has thickened up substantially. Spoon on to a plate and leave to cool


• Beat the light brown sugar with the sunflower oil and eggs until thick and slightly aerated (little bubbles will appear on the surface).


• Beat in the banana mixture, the yogurt and the lime zest and juice.
• In a separate bowl sift together the dry ingredients: flours, spice, baking powder and soda. You may want to sift more than once, to ensure that the ingredients are well mixed together. The large flakes of rye bran won’t go through the sieve, so just tip them in at the end and stir through.
• Fold the dry ingredients into the wet until just incorporated.
• Pour into the baking tin and bake for around 40 minutes (this will depend on your oven and on the size of tin you use). The top should bounce back when gently pressed. Cool cake on rack.

To make the icing:

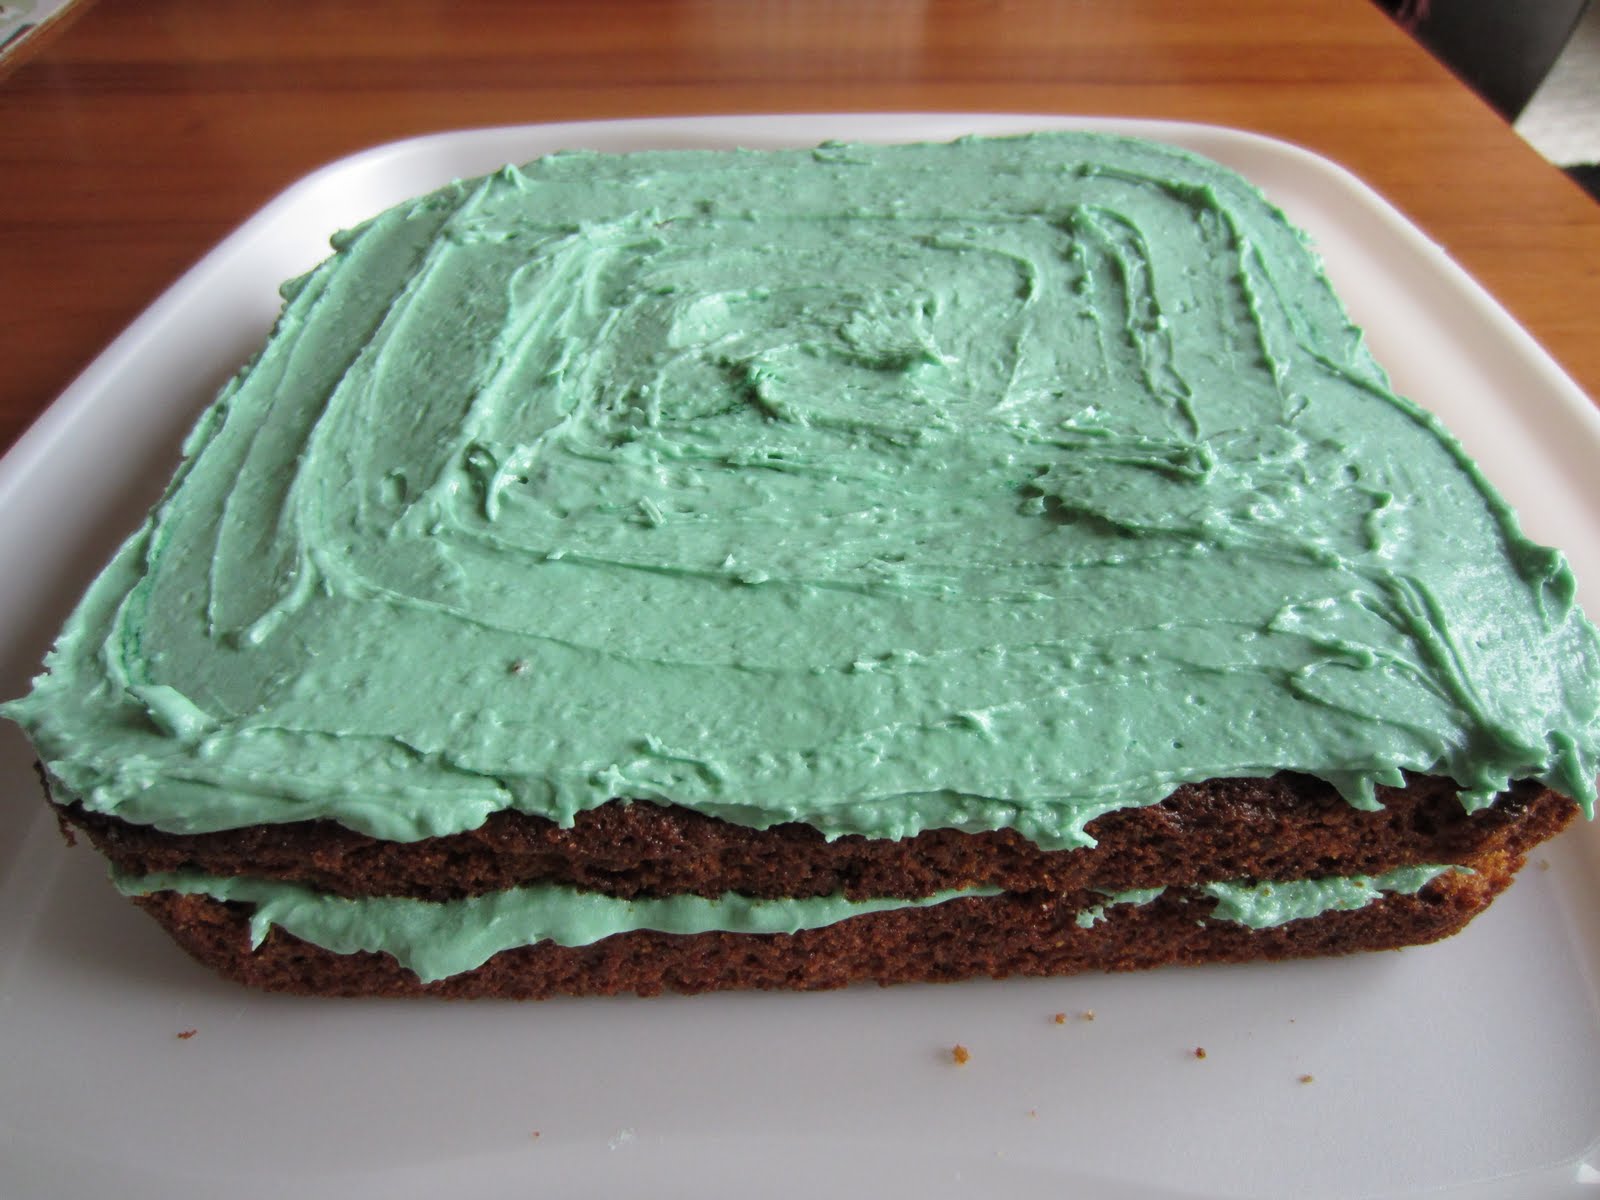
• Whisk together 75g soya spread, 300g icing sugar and 2T soya milk, juice and zest of one lime. I got a little carried away and also added green food colouring. You can judge the results for yourself.

• Once cake has cooled, cut in half and ice in the middle and on top.


Tuesday, August 16, 2011

Melissa Salad

This tasty salad is a perfect accompaniment for those hot days when you want refreshing summer dishes. The name comes from the use of the Orange balm leaves (from the melissa plant family) which I discovered on one of many trips to a garden centre with the other half. I didn't realise it was orange balm until I did a little research at home, it was the scent from crushing a leaf between my fingers that persuaded me to add it to the overflowing basket! It's citrus scent is amazing and I decided to add the orange chunks to complement their favour. The best part about this salad is that herbs like basil and orange balm are very easy to grow at home in the U.K, and even in our Barcelona window boxes, so there is no excuse not to have a little herb garden of your own!
Ok, I have jumped down from my herb growing soapbox, but anyway try the salad, even if you cant get your hands on the orange balm maybe throw in a little mint or fresh oregano!


Ingredients:                                        Serves 2

  • 2 large, ripe tomatoes
  • 1/2 medium onion
  • 1 juicy orange (taken straight from the fridge)
  • a handful of basil leaves
  • 8 orange balm leaves
  • salt
  • pepper
  • olive oil
  

Cut the tomatoes in half and then half again and slice into 1cm slices. Thinly slice the onion (as fine as you can) and top and tail the orange then cut away the peel and pith, slice into 2 cm slices and chop into small chunks. Tear any large basil leaves in half, you still want to keep them fairly large for maximum taste.

Mix all of the above ingredients together and season with salt (rock salt if you have it) then drizzle a generous amount of olive oil. Now finely slice/shred the orange balm leaves (using a knife) and scatter over the top along with a good pinch of ground pepper. Leave the salad to marinate for a minimum of 10 minutes (to allow the juice from the orange, tomatoes and oil and salt mix together) and then serve at room temp.

Serve with rice and beef kofta kebabs.


Monday, August 15, 2011

Apricot and Cardamom Biscuits


I can't remember when it was I had the desire to make biscuits but it was less than a year ago, before that the singular attempt at shortbread had left me with a baking tray full of sloppy, sugary, buttery mess and quite frankly put me off biscuits for some time. Thankfully I overcame the fear and discovered a great basic biscuit dough recipe which had suggestions to add lemon or chocolate, but I didn't want that. I opened the spice cupboard in search of something tasty to flavour them with when I set my eyes on the bag of cardamom pods, the aromatic scent mixed with some sweetness from apricots would be the choice. Ever since then even when I attempt another flavour I always keep half the dough aside to throw in some chopped dried apricots and ground cardamom.

Ingredients:
  • 125g butter
  • 70g caster sugar
  • 1 egg yolk
  • 1tsp vanilla essence
  • 160g plain flour (plus extra for dusting)
  • A handful of dried apricots
  • 6-10 cardamom pods

Method:

Cream the butter and sugar in a bowl with a wooden spoon then add the egg yolk and vanilla essence until well mixed.
Next, sift in the flour and mix once more until the flour is combined. You will probably need to get your hands in there and get pressing the ingredients together.
This should leave you with a perfect biscuit dough, it should be a little sticky, but not stretchy. If you think it is too stretchy or sticky just add a little more sifted flour and keep kneading until it feels firmer.

 
 Next, take the seeds from the cardamom pods and grind in a pestle and mortar (just wait until the scent is released - delicious!) and chop the dried apricots into small chunks. Add these to the dough and mix with your hands until evenly incorporated.
Flour a worksurface and rolling pin and roll the dough into a rough rectangle about 1/2 an inch thick. Using a sharp knife cut into long, fat, finger shapes and tranfer the fingers to a lined or greased baking tray about 2cm apart (they dont tend to spread too much when baking) then put them in the oven for 8-12 mins or until nice and golden.

Leave to cool on a wire rack (let them cool in the tray a little first as then tend to be very soft when they just come out of the oven!) and serve with a cup of your favourite tea. I suggest a nice cup of Chai tea or even a cup of Cinnamon, Vanilla and Honeybush.


Chilli Orange Vodka Cake

The heat from the chilli, the spike from the vodka and the freshness from the oranges combine perfectly to create this moist, delicate cake. Dont worry, the chilli only adds a warmth at the end of each bite, no need for gallons of water to cool your mouth afterwards!

There is an interesting story as to how I discovered this cake: it was a good friends birthday and I was determined to make a "disgusting" cake (not out of hate but for a joke). I stumbled upon an online recipe for this cake and the rest was history. Oh except for the 4 or 5 attempts at making the online recipe failed. That was it, it was then decided that i would take the ideas of the recipe and make a cake that actually works. So here is my version below.

Ingredients:
  • 200g unsalted butter

  • 200g caster sugar

  • 100g ground almonds

  • 100g plain flour (can be substisuted for rice flour for a gluten free version)

  • 1 tsp baking powder (watch out as a lot of these contain gluten!)

  • 1 tsp bicarbonate of soda

  • 2 eggs, seperated

  • 1 tsp vanilla essence

  • 2 oranges

  • 2 tbsp sherry (optional)

  • 1/2 lemon

  • 1/2 lime

  • 1 tsp chilli flakes (plus an optional fresh chilli for decoration)

  • 4 shots of vodka

Method:

Pre-heat the oven to 160ºC and grease and line a cake tin.
Cream together the butter and sugar until fluffy, then add the grated zest of one of the oranges and the egg yolks.

Next add the vanilla essence, sherry and ground almonds, flour, bicarbonate of soda and baking powder gradually to create a very thick batter. Add the juice of one orange to loosen the batter and mix well. Once mixed, whisk the egg whites in a clean bowl until they form firm peaks. Then add half the egg whites and fold into the mixture before adding the second half and folding the mixture until incorporated fully.
Pour the batter into the cake tin and bake in the oven for 50 minutes or until a skewer comes out clean. (I usually check on mine after 40 mins to be sure)

While the cake is baking, use a potato peeler and peel half the lemon and half the orange, place the peel into a small saucepan along with the chilli flakes, two heaped tablespoons of sugar and half a cup of water. Place over a low heat and once it reaches a simmer leave it on the heat for 10 minutes. Then remove and cover leaving the flavours to infuse the syrup further.


Once cooked, take the cake from the oven and place it on a cooling rack, put the syrup back on the heat and then juice the remaining orange, half lemon and half lime and add the vodka to the juice. Next transfer the cake from its tin onto a serving plate and prick all over with a fork or skewer.

Now strain the syrup (keep some of the sugared peel and chilli for decoration if you wish) and add the fruit juice and vodka mix. Drip feed this all over the cake using a spoon and allowing the liquid to soak in each time before adding more. Do this until all the juice mix is used, you will be surprised at how much the cake will absorb! Serve in big slabs once cooled.

I generally find that this cake is moist enough to not need anything like cream or ice cream but if you want to present it nicely i suggest a little shot of your favourite liquer. I chose Amaretto which would make it perfect to have after dinner, but if you want to serve it "virgin" just forget the vodka and serve with some fresh, tangy sorbet.


Sunday, August 14, 2011

Oaty Choc-Chip Cookies

Most of the time being dairy-intolerant isn’t so very bad... but when the chocolate cravings hit home I’m first in the queue with my big stock of galaxy bars. The thing is, while I’m happy to nibble on a decent dark chocolate bar, sometimes I just want to eat MORE. So I’ve turned over a new leaf and am determined to find dairy-free ways to get my full chocolate fix...when needs must. These super-chocolaty cookies have an oaty kink, so you can convince yourself they’re healthy and wholesome.

To make a batch of 18 you’ll need:

• 115g dairy-free spread
• 50g light brown sugar
• 65g caster sugar
• 1 large egg
• 1tsp good-quality vanilla essence
• 150g self-raising flour (or you can substitute with plain flour and a tsp of bicarbonate of soda and 1 tsp baking powder)
• 75g porridge oats
• 230g good-quality plain chocolate, roughly chopped

Ten Little Cooking Steps:

• Preheat oven to 190°C
• Line and grease 2 baking trays
• Whisk the spread and the two sugars together until light and fluffy
• Add the egg and the vanilla-essence and whisk well
• Sift the flour and fold into mixture
• Fold in oats and chocolate
• Place generous spoonfuls of the mixture onto the baking trays


• Bake for around 15 minutes until just turning lightly golden
• Cool on rack


• Enjoy


Garlic Bread with a Twist

When I made the Creamy Fusilli last week I decided to be a little extravagant and put some garlic bread together to have with it.

This is a really flexible little recipe that has potential to be dairy-free, gluten free or even vegan

Firstly, you need to make sure you buy a lovely fresh baguette (or for gluten-busters/vegan the best quality gluten-free/vegan bread you can lay your hands on). Decent bread definitely makes a difference! I used a fresh organic and it was super-delicious.

Next, cut the baguette in half and position on a baking tray (or if you are using a sliced loaf, position single slices on the tray).
Pre-heat the oven to 180ºC

Now for the garlic-butter topping! Use a good quality soya or sunflower dairy-free spread. The Pure range works well for this, although I’m sure there must be decent equivalents outside of the U.K.

The quantity you need will depend on how big your baguette is, but don’t worry if you don’t make quite enough... it’s so quick and easy to mix a little extra.

I used 150g soya spread mixed vigorously with 2 crushed garlic cloves... and then mixed in the magic ingredient – a handful of freshly chopped parsley. Hmmmm.

Spread a thick layer on top of the bread and bake for around 10 minutes, or until the edges begin to brown.


And now for a luxury cheesy option (use either a mild lactose-free goat’s cheese or a vegan cheese alternative). Grate a generous layer of cheese on top of the bread and bake for a further 5 minutes.


Great with any pasta dish! Feel free to use more garlic... though be prepared to be ooozing it for a day or two. Hmmm... might be worth it!

Flourless Chocolate Brownies

This recipe came to my attention after my sister-in-law made a delicious first batch for her gluten free husband and father-in-law (my brother and dad).
The recipe is no closely guarded secret, but I think it should be. I have gained a love-hate relationship with these brownies, everyone loves them but I hate repeatedly making them! I need variety people, so I have become a sort of "keeper of the keys" with this recipe, but now it is time to reveal the secret (if you can call it that). Taken from the fabulous domestic goddess that is Nigella Lawson but I have added my own twists.
This brownie is an amazing feat being both immensely chocolatey and still gooey and fondant-like.


Be warned this recipe is not for the diet conscious.

Ingredients:
  • 225 grams of dark chocolate (70% cocoa)

  • 225 grams of unsalted butter

  • 1/2 a vanilla pod (you will use the seeds)

  • 225 grams of ground almonds

  • 200 grams of caster sugar

  • 3 eggs lightly beaten

  • Optional - 75 grams of chopped hazlenuts (or any other nuts you may fancy)

Method:


  • Preheat the oven to 180º C. Melt the chocolate and butter over a low heat in a heavy bottomed saucepan

  • Once melted take the pan off the heat and add the sugar then the seeds from half the vanilla pod. Allow the mixture to cool a little

  • Add the beaten eggs and a few spoonfuls of ground almonds (to stop the mixture curdling) and then gradually add the rest of the ground almonds. Add the hazelnuts if using.

  • Pour mixture into a baking paper lined tin or make life easy and just use takeaway foil trays (much easier to remove the brownie from it too!).


  • Bake in the oven for 20-25 minutes until just set and slightly cracked on top. At this point the centre of the brownie will still be nice and gooey. Remove and set aside to cool. Once cooled cut into squidgy squares and serve with a good quality vanilla or cream ice-cream. Occasionally I like to add some nice tart berries to counter-act the sweetness!


Oh and for those colder days I like to zap each square in the microwave for just 30 seconds, rendering it a gooey, oozing chocolatey mess that just screams to be eaten.

Aromatic Sea Bream

This really is a perfect dinner-party dish. Minimum effort, but with maximum taste from a mix of simple ingredients and all with absolutely no skill needed (unless you are particularly keen in de-scaling and gutting your own fish), and the best part? Well it's perfectly gluten (using gluten free bread) and lactose free!

As for the fish, I usually pick mine up from the market but most British supermarkets have fairly decent fish counters so dont be afraid to use them. Also Sea Bream can be quite expensive in the U.K so feel free to try this dish with another type of meaty, white fish and let us know what works well.

Serves 4

Ingredients:
  •  4 Sea Bream (ask for them de-scaled and gutted)
  •  4 medium potatoes, chopped into chunks with skins on (roughly 1 inch squared)
  •  1 red + 1 green pepper chopped into chunks
  •  1 red onion chopped into large chunks
  • 2 cloves of garlic
  • a teaspoon of fresh chopped parsley
  • a tablespoon of fresh rosemary needles
  • a small sprig of thyme
  • 2 thick slices of white bread torn into breadcrumbs by hand (roughly 40 grams)
  • Juice of 1 lemon and the zest of half
  • Olive oil
  • Salt and Pepper

  1. Pre heat the oven to 180 ºC
  2. Lightly oil the bottom of a large baking tray, add the potatoes and toss in the oil and add a good pinch of salt. (I like to use rock salt but any will do). Place in the oven for 20 mins.
  3. While the potatoes are in the oven, chop the peppers, onion and any other vegetables you want to roast. 
  4. Next, chop ONE of the garlic cloves along with the parsley, rosemary and thyme into a fine mix along with a pinch of salt. Fill the cavities of the Sea Bass with this mix.
  5. Add the vegetables to the roasting tray and drizzle a little more oil over if needed, then pop it back in the oven for 10 mins.
  6. Bash the remaining garlic clove and add 6 tablespoons of olive oil, lemon juice and zest and mix well with 1 tablespoon of water. 
  7. Remove the baking tray from the oven and make space in the centre of the tray for the Sea Bream. Add the Sea Bream and sprinkle the breadcrumbs over the fish then using a spoon slosh on the oil,garlic and lemon juice mix over the breadcrumbs.
  8. Pop the tray back into the oven and bake for a further 20 minutes or until the fish is cooked and the breadcrumbs are golden.


Creamy Mushroom and Olive Fusilli

I set about to create a lactose-free pasta dish that would still taste super-creamy. This is what I’ve come up with... let me know what you think!


Follow these simple steps to make your own creamy goodness:

• Heat a little oil in a frying pan

• Add and sauté 2 finely cut garlic cloves

• Add and cook until lightly brown 250g sliced mushrooms

• Add and cook briefly around 20 pimiento-stuffed olives sliced in half


• Add 175ml dry white wine and cook on a high heat until the liquid is significantly reduced

• Add 175ml natural soya yogurt and stir gently on a low heat for a few minutes


• Stir in a large pinch of nutmeg and 4Tbsp of mild goat’s cheese (make sure you choose a lactose-free variety! I have occasionally been caught out by cheese companies adding lactose ingredients to their goat products)

• Serve over a bed of Fusilli and garnish with fresh parsley


Monday, August 8, 2011

CARDAMOM, FIG AND COFFEE CAKE

Hello and welcome to our fabulous food blog. We’re going to wow you all (eventually) with our free-from scrummy alternative recipes ...

... starting with Anna’s dairy-free:

CARDAMOM, FIG AND COFFEE CAKE

A wee while ago I stumbled across a cardamom and fig cake recipe which looked pretty intriguing. I played around with it to make it dairy-free and added a subtle little coffee twist (actually the recipe was advertised as a cardamom, fig and coffee cake but there was no coffee in it, so I felt inspired to make amends. For additional caffeine satisfaction, consume cake with a cup of your favourite coffee bean). Here’s the final result:


Follow these 10 simple steps to make your own:

Step 1:
Put the oven on 160 ◦C

Step 2:
Grease and line a baking tin

Step 3:
Grind a handful of cardamom seeds [freshly ground works so much better than pre-powered in a jar...plus it’ll make your kitchen smell really fragrantly yummy

Step 4:
Combine the following dry ingredients
• 300g plain flour
• 200g caster sugar
• 1 teaspoon baking powder
• 1/2 teaspoon baking soda
• ½ teaspoon salt
• 1 teaspoon of your freshly ground cardamom

Step 5:
In a separate bowl mix together with an electric whisk until light and fluffy
• 125 ml sunflower oil
• 2 eggs
• 125 ml strong filter coffee
• 200 ml soya milk mixed with 1 Tablespoon of vinegar

Step 6:
Fold the dry mix into the wet mix a little at a time until full incorporated

Step 7:
Stir in
• 150g dried figs [roughly chopped]

Step 8:
Pour into the baking tin and bake for around 40 minutes [nearly clean tooth-pick test]


Step 9:
While the cake cools on a baking rack prepare creamy topping by mixing the following with electric whisk until light and fluffy:
• 75g soya spread [the pure brand is pretty good]
• 200g icing sugar [a little at a time or your kitchen will look like a light snow storm hit it...learn from my mistake!!]
• ¼ teaspoon ground cardamom [or a little more to taste]

Step 10:
Cover the cake with the topping and decorate with a few additional figs...

Eat up!