Wednesday, December 7, 2011

Sweet Dumpling Squash with Lemon-Herb Rice


Following on from stuffed peppers and continuing in the stuffing mode... Stuffed Sweet Dumplings. I’d never eaten these little beauties before. A friend pointed them out and recommended that I give them a go. A definite thumbs up. They are visually pleasing and the taste is equally sweet. Likely to be swiftly devoured! This is a nice and easy vegan recipe that will serve two hungry bellies in a heart manner.
Ingredients

• 2 Sweet Dumpling Squash
• 1 medium onion
• 1-2 garlic cloves
• 300g rice (I used basmati but any rice will do)
• 1 lemon
• 1 Tbsp soy sauce
• A few generous sprigs of fresh herbs ( I used parsley, thyme and rosemary)
• 50g pine nuts (or a few more if you prefer)
• Salt and pepper (to taste)

A few simple cooking steps

• Preheat the oven to 200ºC


• Cook the rice
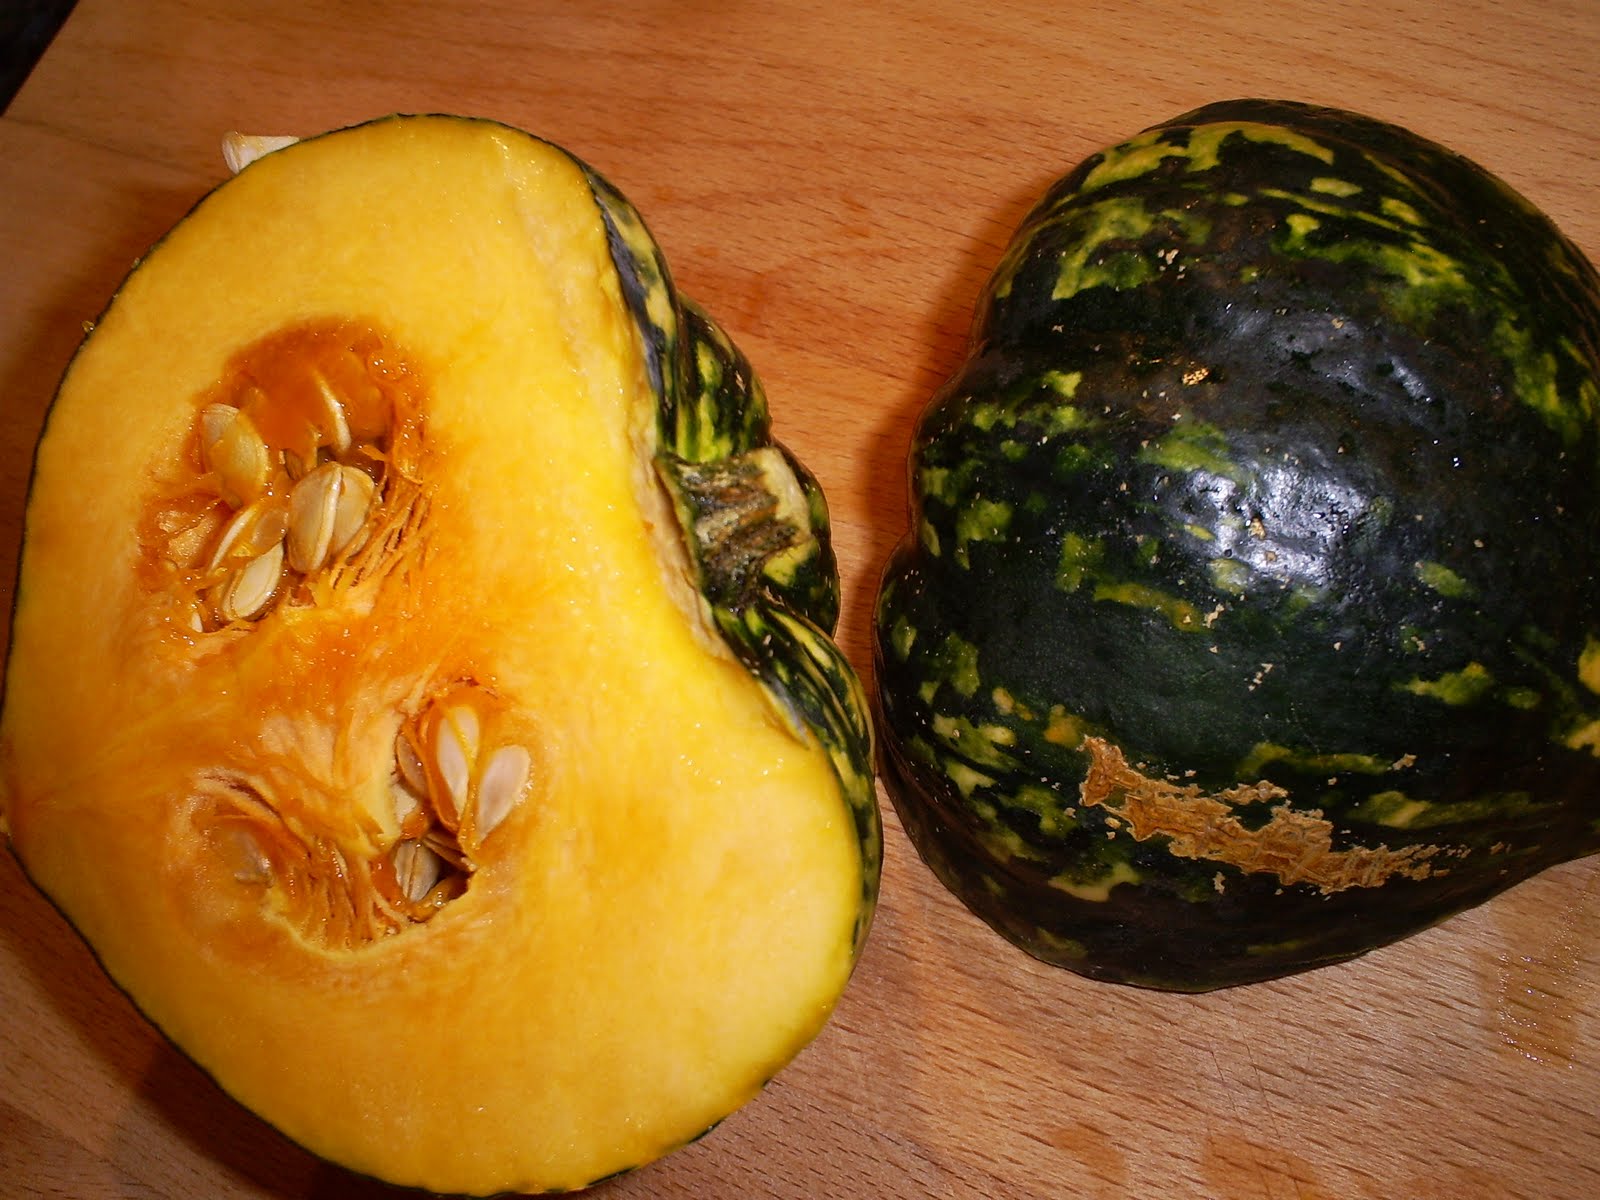


• Cut the two squash in half and remove the seeds and strings


• Sprinkle the squash with salt and pepper


• Place squash face-down on baking sheet and drizzle with oil


• Bake until tender (around half an hour)


• While the squash are baking: chop the onions and garlic and sauté

• Add the rice, 3Tbsp water, the juice and zest of the lemon, the soy sauce, pine nuts the herbs (chopped) and salt and pepper (to taste)


• Stir the stuffing until well mixed (add a little more water if necessary)


• When the squash are cooked through, place them upright and fill with the stuffing. Cover with foil and return to oven until heated through (around 15 minutes)


• Enjoy!

Friday, November 25, 2011

Red Wine Chocolate Cake


Let me start with an apology, followed by some shallow excuses! (haha) A big sorry to all those who have been waiting forever for the next post, Anna very kindly has been keeping the blog updated while I have been moving (I can officially say I am a homeowner!) and the new flat is wonderful, even if the kitchen is less that a third of the old one! So after tackling with the gas company for quite some time we got connected and I got the pleasure (if it can be called that) of meeting my new best friend - the dreaded gas oven! It features all mod-cons such as a temperature gauge that relies on guess work (yes it ranges from gas mark hot to gas mark cremation) as well as a hob that can only do a fierce boil. So its back to the drawing board for recipe with the list of temperature sensitive cakes being thrown out of the window.

So back to the bit you are here for - the cake! This really is so simple, one bowl, easy to cook, no mess but lots of flavour. The red wine gives it a really rich and deep flavour (so choose wisely) and the chocolate adds that touch of decadence to the end of a light meal. I served mine with a mascarpone cream and let me say it is well worth having these ingredients to hand as they go so well together.

Ingredients:

85g of unsalted butter (room temperature)
180g of dark brown sugar
50g of white sugar
1 egg + 1 yolk
Just under 1 large glass of red wine (about 180-200ml)
1 vanilla pod (vanilla essence will do)
135g of plain flour (make sure it isn't self raising!)
40g cocoa powder
1/8 tsp of bicarbonate of soda
1/2 tsp of baking powder
1/4 tsp salt
1/4 tsp ground cinnamon

Mascarpone Cream:
150g Mascarpone cheese
150g whipping cream
2tbsp of sugar
1tsp vanilla essence

Method:

Preheat the oven to 160 degrees celsius and line a cake tin with parchment and grease the sides well with butter. Start beating the butter until light and fluffy and the sugar and beat well (until smooth and combined). Next beat in the egg & yolk.


Next add the red wine and vanilla. At this point the mix will look a little strange (see picture above) but dont worry, once you start to add the dry ingredients it'll look a little better. Mix all the dry ingredients together and sift into the wet mix, until almost combined, then use a rubber spatula to fold the mixture together until well combined. Pour into the prepared cake tin and bake in the oven for 25-30 mins (or until a skewer comes out clean), I found mine needed longer, but I had to play around with my oven temperature! The top of the cake should look shiny and smooth and yet again mine didn't, but it still tasted pretty damn tasty. Let the cake cool for 10 minutes in the tin then remove and let it cool completely. 


For the Mascarpone cream: Whip together the cream, mascarpone, vanilla essence and sugar until soft peaks form (being careful not to overwhip). Dollop a spoonful on top of each cake slice and serve with some liquer of your choice!

Monday, November 21, 2011

Stuffed peppers


So the blog ground to a halt, arrested, cut short, brought to a standstill. And while Andrew has the excellent excuse of having recently moved house, I have no excuse at all. It’s not like I stopped cooking, baking, making... and I even took plenty of foody photos along the way. Once the sneaky lag in writing steps in it’s hard to overcome. Soooo. Tonight I prepared myself, did all my procrastinating early in the evening, and now am tucked up in my dressing gown, with a bedtime drink and am bringing the blog back to life.

And I do have lots of new recipes I’ve been trying out that I’d love to share.

I’ve made this stuffed peppers recipe a few times now and it’s one of the best vegan meals I’ve ever eaten. I recently had to cater for a mix of people including: veggie, reluctant to eat a meal with no meat, dairy intolerant and gluten intolerant and this turned out to be quite a winner. No leftovers.

It’s not a very quick dinner to prepare, but it’s really not difficult to get right. I hope you enjoy it as much as we did.

Ingredients
  • 8-10 sweet peppers
  • olive oil for frying
  • 1 onion, diced
  • 2 garlic cloves, finely sliced or crushed
  • 175g mushrooms, sliced
  • 250g rice
  • 90g red lentils
  • 450ml vegetable stock
  • 60g pine nuts
  • several generous sprigs of fresh parsley, finely chopped

Basic cooking steps


Heat a little oil in a large pan and gently cook the onion, garlic and mushrooms until soft

(I've also used shallots in place of onions which turned out pretty good)


Add the rice and lentils and a little extra oil and stir


Pour in stock and season with salt and pepper

Bring to the boil and simmer gently until the rice is cooked. Add a little more water if required. This will take around 15 minutes but will depend on the type of rice you decide to use


While the stuffing cooks, prepare the peppers: carefully cut the tops off and keep to one side, rinse out the cores and seeds

Preheat the oven to 180°C


Stir in the pine nuts and parsley and check for taste - if you like it a little spicier, add a dash of cayenne pepper


Divide the stuffing between the peppers (depending on the size of the peppers you may have a little stuffing left over...but this is pretty yummy to eat just as it is!)

Stand the peppers upright in a casserole dish and place the tops back on

Pour a little cold water into the bottom of the dish and bake for 30-40 minutes until peppers are nicely tender


Serve with a green veg. Peas work well!

Wednesday, September 28, 2011

Rose Cookies


When I fancy a sweet treat that doesn’t rely on the addition of chocolate, this is one of my favourite options. Light and fragrant and very moreish. Pretty quick and not to tricky to make either. Will leave your kitchen smelling sweet and calm.

So here goes:

Ingredients

  • 225g soya spread
  • 225g caster sugar
  • 1 egg
  • 2Tbsp. soya milk
  • 300g plain flour
  • pinch of salt
  • 1 tsp. baking powder
  • 1Tbsp. rosewater
  • icing sugar (to decorate)
Baking steps

1) Preheat oven to 190°C

2) Grease and line two baking trays


3) cream that soya spread and sugar together until light and fluffy


4) stirr in egg and soya milk and rose water until just combined


5) combine and sieve the flour, salt and baking powder into the mixture and stir in with a metal spoon


6) place heaped teaspoons a few centimetres apart on the baking trays


7) cook for about 10 minutes until just turning lightly golden

8) leave to cool on a cooling rack


9) dust with icing sugar and enjoy with a nice cup of tea. Yummy!

Sunday, September 11, 2011

Broccoli and Tomato Pasta

Saturday afternoon, still slightly drunk from friday night (yes - apparently I can't drink that much) and craving something healther than the previous days melted cheese fest, I opened the fridge to find.... not a lot. So after pulling a head of broccoli, a few tomatoes and a mountain of garlic from the fridge there was only one option, pasta! This created a really tasty lunch for 2 hungry people and took less than 30 minutes.

Ingredients:

1 small head of broccoli
2 ripe tomatoes
2 small cloves of garlic
a small handful of parsley
butter/olive oil
pasta
juice of 1/2 a lemon
black pepper
salt

Method:

Put on a large pot of water to boil. Pick small florets from the head of broccoli and steam for 3-5 minutes over the water (use a sieve or colander over the pot of boiling water). Keep the water boiling after steaming the broccoli, salt and add your choice of pasta and cook as the packet instructs. Meanwhile finely slice the garlic cloves and add to a cold saucepan (big enough for all the ingredients) with a slug of olive oil and a large knob of butter. Put over a low heat to infuse the oil and cook the garlic. Chop the tomatoes into small chunks and tear the parsley leaves from the stems.


Once the garlic is starting to fry add the steamed broccoli and turn the heat to a medium-high, and sauté, tossing the garlic and broccoli together every few minutes. Next add the tomatoes and toss everything together. Just as the tomatoes begin to soften (around 3 mins) add half a cup of the pasta water and a good pinch of salt and lots of freshly ground black pepper, let cook for 2 minutes then add another knob of butter (or glug of oil), the fresh parsley and cook for one minute more. Drain and add the pasta and toss everything together.


Serve with a few sprigs of parsley and a drizzle of chilli oil.